Sometimes a picture doesn’t say it all. Sometimes you need to also add some text, draw a circle or two or perhaps highlight something. So if you have taken a photo or a screenshot, you can now use the pens and pencils on the iOS device to give it some extra oomph.
Annotate Images In iOS 11 With Instant Markup
I have taken a screenshot of my iPhone screen. Let’s say I want to show that screenshot to a friend and highlight some of the apps on the screen.
First, take the screenshot in the usual way (home button and power button together). But with iOS 11, there is now a slight change. When the screenshot is taken, a thumbnail of it appears in the bottom left hand corner of the screen.
This new “feature” is highly annoying, but as yet there is no way to switch it off. Maybe with a future update, Apple will provide an option to toggle it off. When the thumbnail appears in the bottom-left of the screen, tap on it and it will now open up the annotation tools.
Before we look at the tools, I just wanted to point something out. If for any reason the thumbnail disappears before you have a chance to tap on it, do the following. Go to the screenshot in your photos app and tap “Edit” at the top.
Now tap the three dots at the bottom of the screen.
Then tap “Markup“. This will bring you to the Markup screen that we are about to take a look at.
The Annotation Tools
Let’s examine each tool as it appears on the screen from left to right. To select and use a tool, just tap on it and it will appear slightly bigger. As you annotate your image, anything you do can be immediately undone with the “Undo” icon.
After the blue sharing menu, the first tool is a fine ink pen which could be used for writing on a tablet screen with your finger. Or for circling things, like so.
Then there is a thicker ink marker, which to be frank isn’t that great as you can see.
Then there is the pencil. I am not showing a screenshot for that one, because the pencil doesn’t show up well on my dark wallpaper. The one after that is an eraser, which again doesn’t require a screenshot. It is very self-explanatory. The next one really confused me. It’s apparently called a “Magic Rope” (kind of like a magic lasso that you would see in Photoshop or GIMP. But whenever I tried to use it, it would make a dotted shape but then….nothing. Searching online, everybody acknowledges it as a “magic rope”, but nobody ever discusses it. It’s like the unwanted child in the room. If anyone can shed any light on the mysterious non-functioning magic rope, please let me know in the comments.
Several Choices Of Colors
When you open Instant Markup for the first time, it uses black ink by default. But there are other colors if you prefer those instead. Simply tap the black circle and the other colors will appear. When you have chosen your color, tap on the tool you were using (pen, pencil, marker), and the colors will disappear again.
Circles, Squares, Text & Magnifier
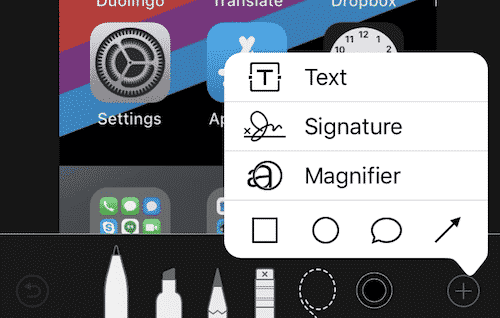
If you go into Instant Markup via the Photos app (as I showed you above), there is an additional button. The options are self-explanatory – add text, add your signature, or use a magnifying glass. You can also enclose something on the image with a square, circle, speech bubble, or an arrow. Tapping the color options will then make that shape change color right away until you find the color that fits the best.
Conclusion
At the time of writing, it is impossible to switch Instant Markup off. You also can’t switch off the thumbnails when you take a screenshot. Many people online, who are less than impressed with the markup features, are loudly wishing for an iOS update soon that will enable them to switch all of this off. Personally, I want an update that improves the feature, as right now it is looking rather basic and bare bones. If you feel the same way, you may be more inclined to use Skitch or another image editing app.


