If you have Gmail, this is a simple affair. Email from other addresses can be sent to one central inbox and they can be neatly labelled, filtered, and archived. This is much better than checking countless separate email addresses one by one. Also, if you freelance for multiple clients and they each give you an email address, better it is all sent to one place.
How To Automatically Forward An Email Address To Gmail
I have set up a new Gmail address for this article and I am going to show you how to set it up to forward it to an existing email address. There are two parts to this. There is simple straightforward forwarding, but if you also want to be able to reply from this address in your one central inbox, then you need to do a couple of extra steps.
Simple Straightforward Forwarding
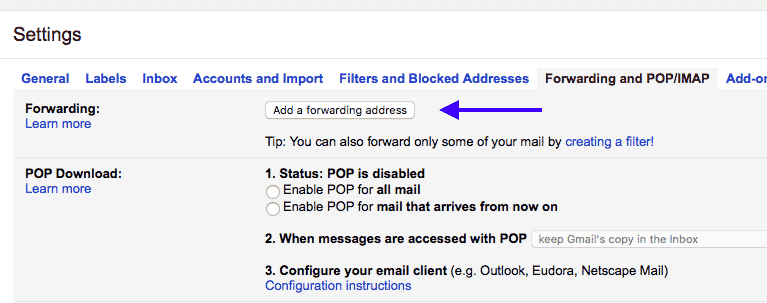
First, go to the settings of the email address you want to forward, and find the “Forwarding and POP/IMAP” tab. Click on “Add a Forwarding Address“.
A box will come up asking you where you want to redirect the mail to. Enter the address then click “Next“.
You’ll then get a sort of “are you sure?” type of confirmation box. If all looks good, click “Proceed“. Otherwise, click “Cancel” to start again.
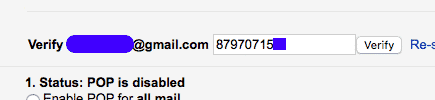
You will be sent an email to the address you want to forward to, to verify you indeed own it. Copy and paste the activation code provided into the settings box as shown below. Then click “Verify”.
Deciding On The Next Options
Assuming you have entered the correct verification code, you will now see new options in the forwarding tab.
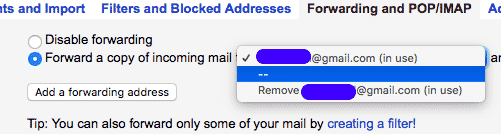
First, click the “Forward a copy….” option and drop down the menu. If you have several forwarding addresses set up, they would all be in this list for you to choose from.
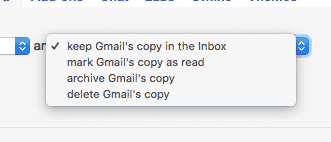
As you can see, you can also remove an email address if you decide not to use it anymore. But if you want to keep the forwarding feature switched on, there must be at least another email address in that list if you choose to delete one. Next, decide what you want to do with the original copy of the email. Personally I delete the original as I detest clutter. But if they are work emails, you may decide having a backup of everything is prudent.
However, if it is simply Grandad Gerald sending you dirty jokes, then you don’t have to keep backups. Click “Save Changes” at the bottom and when you are taken back to the inbox, you will see a sign at the top.
If you don’t see that pink bar, then you haven’t done things properly. Go back to the settings and start again.
Filter The Email To Give It A Unique Label
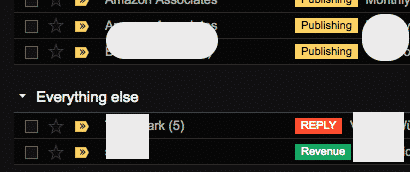
When you start to have lots of addresses converging in one place, it is easy to lose the overview. So labelling each one with a unique label will tell you at a glance which email is which. Labelling like this is also good if you are planning on dumping an email address. By looking at the labels, you can see instantly how active that address is.
Setting Up a Filter
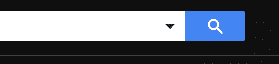
In the top Gmail search box, type in the email address you want to label, prefaced with “to:” So… This brings up all the emails under that address. Now drop the arrow down at the right hand side of the search box.
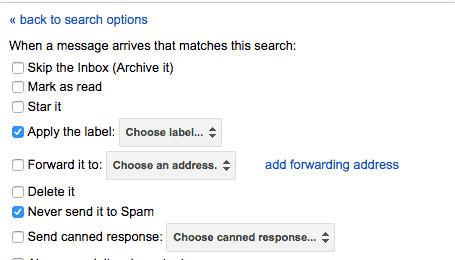
You will now be presented with email details. Only keep the name of the email address in and leave everything else blank. Now click “Create filter with this search” in the bottom right. In the next screen, choose “Apply The Label” and either choose an existing label or make a new one. Also click “Never Send To Spam”. Then save the lot.
If you have more email addresses forwarding on, start the process again to set up another label.
Set Up Sending Email From That Address
If you are having email sent from an address, you may want to reply from that same address in your central super-duper inbox. Otherwise you will have to log into the other email address anytime you want to send a reply…
The Initial Steps
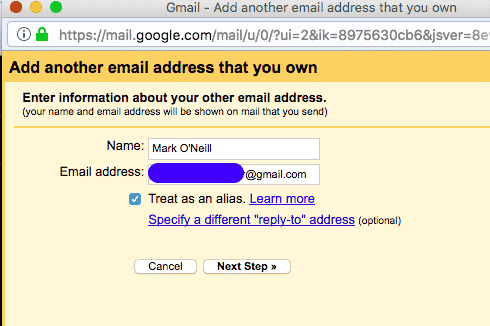
In the settings, go to Accounts and Import. Then scroll down to “Send mail as”. Now click on “Add another email address”.
A pop-up box will open, so make sure you have allowed Gmail to open pop-ups. Your name will be pre-populated. All you need to do is enter the new email address you want to reply from. Click “Next Step”.
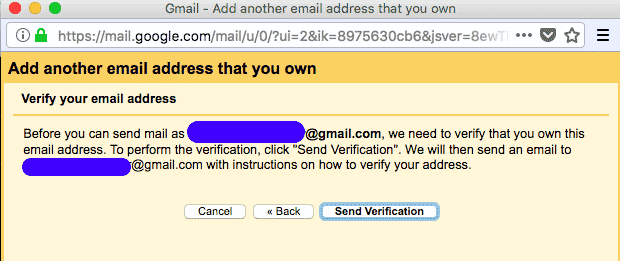
It will now tell you that an email will be sent to the new address to verify you own it. Click “Send Verification”.
When you receive the email, enter the verification code in the box provided, then click “Verify”. That’s it!
Two Last Things To Check
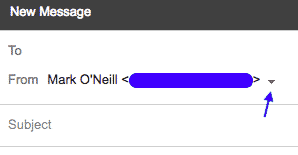
Go back to your “Accounts and Import” tab, refresh the page, and see if your new account is there.
If it is, open a new email window and where you see your email address, click the little downwards arrow on the right. Can you see the new address in the list? If so, choose it to start emailing from it.
Conclusion
Some people swear by checking multiple inboxes individually, and Gmail does try to make that as easy as possible. But it still takes time and effort – which is not needed. Save your energy. Save your sanity. Have the emails sent directly to you.