This is easier than you might think, although it takes a bit of time to do. At least 30 minutes to download the last stable version of the operating system. But considering how much time is taken up installing constant beta versions, another 30 minutes to downgrade your system is well worth it.
How To Downgrade Your MacOS System To Something More Usable Again
Faced with this situation, some people may decide to choose the nuclear option. This is booting into recovery mode, wiping the Mac, and reinstalling from scratch. But for me, this is rather extreme. It’s like using a machine gun to swat a fly. The easiest method by far is to switch off any future beta versions, and then use the App Store to download the last stable version. This method leaves all your installed apps and files in place.
Something Important To Note However
If you are downgrading from High Sierra from Sierra, you will HAVE to wipe the drive and start again. This is because High Sierra introduced a brand new file system from HFS+ to APFS. So in this sole instance, you will have to boot into recovery mode, wipe the drive, and start again unfortunately. What I am about to show you can easily be done with all systems prior to Sierra and all systems after High Sierra. Sierra and High Sierra is just the one exception because of that file change switch. But with the official release of High Sierra coming on September 25th, this is not really an issue anymore.
Open Up System Preferences
The first step is to stop all future beta versions from being pushed to your Mac. You do this by going to your System Preferences, and then choosing “App Store“.
There will now be an option that says “Your computer is set to receive beta software updates“. But the “Change” button next to it is greyed out and inactive. So click the padlock in the bottom left-hand corner, enter your password, and the “Change” button will activate.
When you click the “Change” button, this box will pop up. Obviously choose “Do Not Show Beta Software Updates“.
Remember to now click the padlock at the bottom left again to save and lock the changes.
Download & Install The Last Stable Operating System
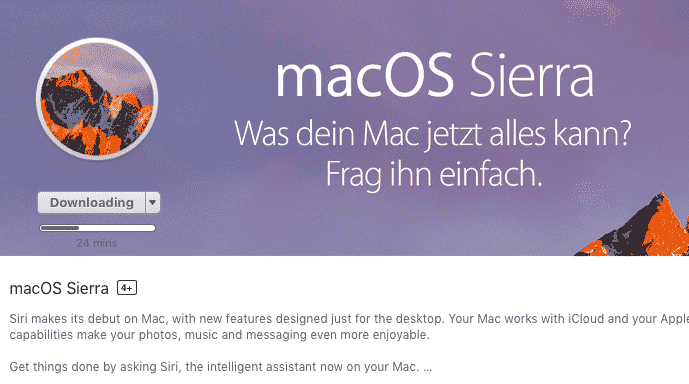
This is the longest and toughest part. Long because it will take a minimum of 30 minutes to download. Tough because if your Internet connection blinks out for more than a few seconds, your download will fail. That means starting again from scratch. Go to the Mac App Store, to the Featured tab. Now look in the “Quick Links” column on the right-hand side. The current stable version of the operating system should always be there. At the time of writing, that operating system is Sierra. Click on that.
In the top-left hand corner, there will be a “download” button. Click that to start the process.
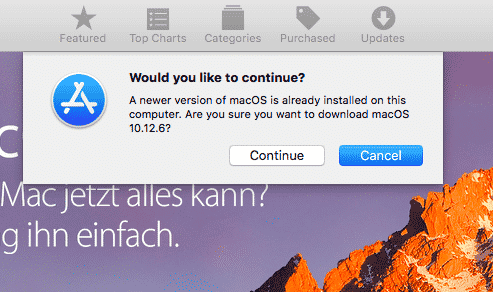
It will warn you that you are downloading an older version of the operating system, than the one you currently have. Ignore that and click “Continue“.
Leave it to download – and hope it doesn’t stop due to Internet problems. If it does, you may have to restart the App Store.
Once it is finished, that “Downloading” button will change to an Open button. Now before you start downgrading your operating system, you need to take some precautions.
Save any unfinished work and close the files. Move it into cloud storage or a removable hard drive. Move ALL important files off the Mac and into cloud storage or a removable hard drive. Shut down all other open applications to speed up the rebooting process.
When you’ve done all of that, click “Open” and let the Mac do its thing. It might be best to go and do something else in the meantime.
Going Back To The Sierra & High Sierra Problem
Assuming you decided not to wipe your system and wait instead for the official release of High Sierra, you will be in a unique situation. The official High Sierra will be out, and you will be stuck on a previous beta release (if you switched off the beta releases in System Preferences). Once the official High Sierra comes out, you can then overwrite the beta version with the official version using the App Store method shown above. Then all future High Sierra updates will be pushed out to you when they become available.
Conclusion
Really, if you are going to try beta software, the best option is to partition your hard drive. Then run the stable OS for your day-to-day work, and the beta OS in the partition. So if you want rid of the beta OS, it’s a simple case of deleting the partition.