You probably protect your device with a passcode, but an extra layer of protection is always good for security. The same password is used for any notes you protect on any device, iOS or Mac. But you can choose which individual notes you want to lock.
Before You Begin
Before you password protect notes on your iOS device, make sure the device is up to date. You can only lock notes in iOS 9.3 or later. To access your locked notes on your Mac, you’ll need to make sure you’re running OS X 10.11.4 or later. When you update your iOS device from an earlier version of iOS, you’ll be prompted to upgrade the Notes app the next time you open it after the update. You should also enable Notes syncing in your iCloud Settings on your iOS device, or System Preferences on your Mac. Or make sure that you use notes stored locally (“On My iPhone” section in the Notes app) on your iOS device. Notes accounts that sync from a different third-party service, like Gmail, can’t be locked. To make sure your notes are being synced through iCloud, open the “Settings” app and tap on your name at the top. Then tap “iCloud“. Make sure the “Notes” slider button is on (it should be green).
Password Protect Notes
To lock a note, open the folder containing the note you want to lock, and swipe left on that note until you see three icons. Tap the lock icon.
Enter a “Password“, “Verify” that password, and enter an optional, but recommended, “Hint“. Then, tap “Done“.
An open lock icon displays next to the note. Initially, it’s unlocked. To lock all notes you’ve chosen to lock, tap “Lock Now” at the bottom of the screen.
Unlock a Note
To unlock a note and view its contents, tap on the note in the list.
Instead of showing the contents of the note, the Notes app tells you this note is locked. To unlock the note and view the contents, tap “View Note“.
Enter the password on the “View Note” dialog box and tap “OK“.
Lock a Note From Inside The Note
We showed you how to lock all your protected notes in the list of notes. You can also lock all your protected notes from inside any protected note. To lock your notes from inside a protected note, tap the open lock icon at the top of the screen. Remember, all protected notes are either locked or unlocked. You can’t unlock some but not others.
Remove The Lock From a Note
If you decide you don’t want a specific note protected anymore, you can remove the lock from it. To do this, swipe left on the protected note and tap the lock icon.
If the note is currently locked, enter your password and tap “OK“. If your protected notes are currently unlocked, the lock is removed from the note with no password required.
Reset The Password For Your Notes
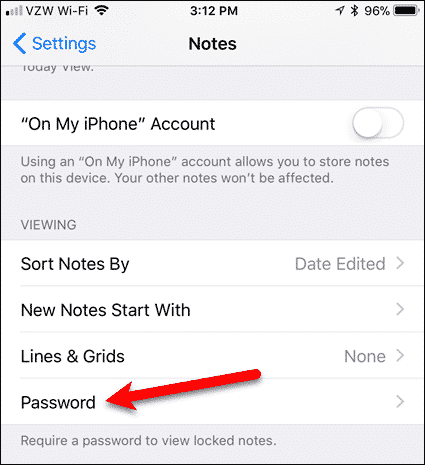
If you’ve forgotten the password for your locked notes, you can reset it, if you know your Apple ID password. If you’ve forgotten your Apple ID password, you’ll have to look to Apple for help. To reset your Notes password, open the “Settings” app, scroll down, and tap “Notes“.
Then, tap “Password“.
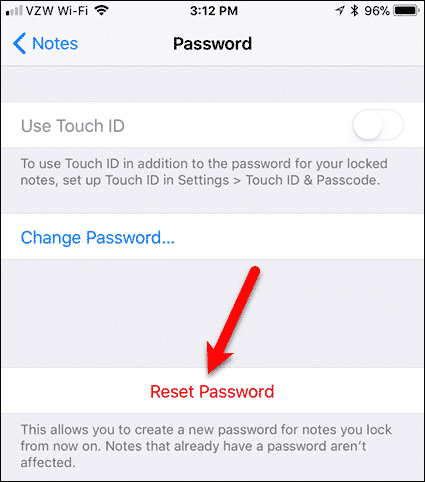
On the “Password” screen, tap “Reset Password“. NOTE: If you know your Notes password and you just want to change it, tap “Change Password“. Then, enter your “Old Password” and your “New Password“, “Verify” your new password, and enter a “Hint” to help you remember your password. The hint is not required, but it is recommended.
Enter your “Apple ID Password“.
Then, tap “Reset Password” again on the popup dialog box.
To set a new password, enter the “Password“, “Verify” the password, and enter a recommended “Hint“. Then, tap “Done“. If you’d rather not have a password set in the Notes app, tap “Cancel“.
Do you put sensitive information in the Notes app? Or do you use another app to secure your information? Share your thoughts and recommendations with us in the comments below.

![]()


![]()


